SPOT ON CHOREOGRAPHY TOOLS
  • HOME
  • BLOG
  • COMPARE DANCE HUDS
  • COMPARE MOVER SYSTEMS
  • UPDATES
  • ANIMATIONS & TIMES
  • FAQ
  • FLICKR
  • YOUTUBE
  • Marketplace Store
  • SL STORE
  • Mesh Products
  • ACCESSORIES
W3.CSS

Choreography Design System

Use the menu below to navigate through the Choreography Design System documentation.

FEATURES QUICKSTART VIDEOS TUTORIAL SUGGESTED WORK FLOW
Designer Ring and Waypoint Menus Mover Options Notecards Multiple Notecards Use with Performance Director FAQ / Tips and Tricks

FREQUENTLY ASKED QUESTIONS


1.  WHY ARE MY WAYPOINTS ADDING THEIR OWN TURN TIME?
Answer:  They are not.  They are only adjusting the default turn time of .5 seconds to accommodate whatever travel time you have set.  The default turn time is .5 so if you set a travel time less than that, say .2, the waypoint's turn time will automatically adjust itself and give you a message that it is doing that.  It is not an error message, it's just information.  Turn time cannot exceed travel time.  ​
2.  DOES TURN TIME ADD TO OR DELETE FROM THE TOTAL TIME FOR THE ROUTE?
​Answer:  No.  Turn time is only the speed of which a dancer turns to FACE the next waypoint.  It has nothing to do with the amount of time traveled / sleeptimes.
3,  DO I HAVE TO SET A TURN TIME?
Answer:  No, it will always use the default turn time of .5 seconds unless you change it or set the travel time below that.  ​
4.  HOW DO I CONVERT 1.X MOVER NOTECARDS TO 2.0?
Answer:  You can do this easily with the Translation Tool provided in your folder.  See "Updating 1.x Notecards to 2.0 - Translation Tool" at the bottom of the Notecards page.  
​5.  CAN I ATTACH AN ANIMATED OBJECT TO A MOVER?
​In most cases, no.  When linking any object to a Choreography Mover, the mover must be the root prim.  Animated object scripts are based on a root prim.  Changing that root prim when linking to mover then breaks the animated object.  Unless you have edit rights to that animation script and are able to change the root prim, it will not work.  You can of course create your own script for an object animation and make the Mover the root prim.  This should work but not guaranteed.
6.  CAN I USE CHOREOGRAPHY SYSTEM AND GROUP FORMATION SYSTEM MOVERS AT THE SAME TIME?
Absolutely!  Just don't give the Choreo movers the same dancer numbers as the Group Formation System dancer numbers.  
For example, you have a lead dancer on Choreo movers and four backup dancers on Group movers.  The backup dancers will be Dancers 1, 2, 3 and 4 and the lead dancer would be Dancer 5.  ​
7.  I KEEP GETTING AN ERROR "DELTA TIMES MUST BE >0.1S".  WHAT DOES THIS MEAN?
It could mean that there is something in your mover notecard that the script can't read - like you forgot to remove the excess text between segments when copying and pasting from chat.  It could also be that you have two waypoints very close together with too long a travel time between them, OR two waypoints too far apart and with too short a travel time between them.  
8.  how can i make a circle using choreography designer?
​Turn time is your only option in this case.   Set it to the same time as the travel time and it'll be the closest approximation to a circle.   Turn time only changes the facing of the dancer, not the direction of travel.   But it's the best you'll be able to do.
9.  HOW DO I use the translation tool to update my old movers to version 2.x?
It's easy to do!!  See the bottom of the Notecards page for instructions.  

TIPS AND TRICKS


​Mirroring
When using the Designer to layout symmetrical routes for multiple dancers when the dancers on the left of the stage will be doing a route that is the "mirror" of the dancers on the right of the stage, you can use the Mirror feature of the designer.

Set out your route for the dancer on one side of the stage, input your Times and SleepTimes as required. Then once you are happy with the finished route select the entire Designer Ring linkset and arrows and do a SHIFT+DRAG towards the direction where you will want the other dancer to be. The Times and Sleeptimes from your original are also copied over to the new one. Click the copy of the designer that you have just dragged over and select the Mirror button on the menu, you will see the Waypoints for this designer move and reposition themselves horizontally opposite of the original, you can then position this mirrored set more accurately and are then ready to rez movers and generate your notecard data on both, in half the time that it took previously!
Using a Mover for Stage Props
Movers can be linked to objects that include their own poses, such as a chair or other object. The Mover must be the root object of the linkset and the linked object should at the very least have a llSitTarget set in the prim that you intend an avatar to "sit" on. SitTargets are usually set using a script such as you'd find in any standard poseball. If using the Mover with any objects attached, the avatar should not sit on the Mover, it would be advisable to ensure the mover is made invisible or at least placed so that it is not unintentionably sat on.  You can find many "sit scripts" and poseball scripts on the LSL Wiki examples and tutorials library http://wiki.secondlife.com/wiki/LSL_Portal

To ensure that the Mover is the root object when you link objects, make sure that when shift+selecting the objects to link that the Mover is the very last object selected. After linking, to visually check, select the linkset and the Mover should appear with a yellow highlight while the other prims should appear with a blue highlight when selected to edit.

If you attempt this with some of the more complex poseball systems such as Xpose or MLP type solutions you may find unexpected results due to the way they rez poseballs that are not linked to their respective objects. It is suggested that you stick to using the standard simple llSitTarget scripts.
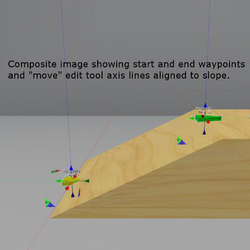
Positioning Waypoints for Best Movement on Ramps or Steps
When positioning waypoints to make use of ramps or slopes, use the red,  green and blue axis indicator lines of the "move" edit tool to align your
waypoint precisely with the start and end of the slope. The designer will do the mathematics and the route will precisely follow the angle of the slope when the waypoints are positioned with the center points directly over the point where the slope starts or ends.  
Picture
  • HOME
  • BLOG
  • COMPARE DANCE HUDS
  • COMPARE MOVER SYSTEMS
  • UPDATES
  • ANIMATIONS & TIMES
  • FAQ
  • FLICKR
  • YOUTUBE
  • Marketplace Store
  • SL STORE
  • Mesh Products
  • ACCESSORIES